Friday, 30 December 2011
Tuesday, 27 December 2011
Sunday, 25 December 2011
Eval And Bind Methods For Asp.Net
The asp.net Eval() and Bind() expressions are heavily used in asp.net GridView and DetailsView data bound controls. The difference between these two is that Eval is used for read only purpose and Bind is used for read/edit purpose.
Syntax For Using :
<%# Eval("Variable")%>
Here Variable is the Name Of Parameter U Want to Pass...
Syntax For Using :
<%# Eval("Variable")%>
Here Variable is the Name Of Parameter U Want to Pass...
Thursday, 22 December 2011
WCF Bindings
BasicHttpBinding
- It is suitable for communicating with ASP.NET Web services (ASMX)-based services that comfort with WS-Basic Profile conformant Web services.
- This binding uses HTTP as the transport and text/XML as the default message encoding.
- Security is disabled by default
- This binding does not support WS-* functionalities like WS- Addressing, WS-Security, WS-ReliableMessaging
- It is fairly weak on interoperability.
WSHttpBinding
- Defines a secure, reliable, interoperable binding suitable for non-duplex service contracts.
- It offers lot more functionality in the area of interoperability.
- It supports WS-* functionality and distributed transactions with reliable and secure sessions using SOAP security.
- It uses HTTP and HTTPS transport for communication.
- Reliable sessions are disabled by default.
WSDualHttpBinding
This binding is same as that of WSHttpBinding, except it supports duplex service. Duplex service is a service which uses duplex message pattern, which allows service to communicate with client via callback.
In WSDualHttpBinding reliable sessions are enabled by default. It also supports communication via SOAP intermediaries.
WSFederationHttpBinding
This binding support federated security. It helps implementing federation which is the ability to flow and share identities across multiple enterprises or trust domains for authentication and authorization. It supports WS-Federation protocol.
NetTcpBinding
This binding provides secure and reliable binding environment for .Net to .Net cross machine communication. By default it creates communication stack using WS-ReliableMessaging protocol for reliability, TCP for message delivery and windows security for message and authentication at run time. It uses TCP protocol and provides support for security, transaction and reliability.
NetNamedPipeBinding
This binding provides secure and reliable binding environment for on-machine cross process communication. It uses NamedPipe protocol and provides full support for SOAP security, transaction and reliability. By default it creates communication stack with WS-ReliableMessaging for reliability, transport security for transfer security, named pipes for message delivery and binary encoding.
NetMsmqBinding
- This binding provides secure and reliable queued communication for cross-machine environment.
- Queuing is provided by using MSMQ as transport.
- It enables for disconnected operations, failure isolation and load leveling
NetPeerTcpBinding
- This binding provides secure binding for peer-to-peer environment and network applications.
- It uses TCP protocol for communication
- It provides full support for SOAP security, transaction and reliability.
Monday, 19 December 2011
How To Create Dynamic RDlC
http://jclaes.blogspot.com/2009/05/programmaticallydynamically-building.html
I am looking Forward To It If I can Create Report Using this I Will Attach Another Post....
I am looking Forward To It If I can Create Report Using this I Will Attach Another Post....
Sunday, 18 December 2011
How To Lock Screen While Processing On Server Side
Their Is Two things To Be Noted ..
1. CSS
2. Javascript
In CSS(Cascade Style Sheet) Their is not Much Popular Attribute which is z-index It is used to Make any Html Element On the Top Of All Html Element Which Is Decide On the Basis Of Its Value element having higher value of z-index is show
Now How To Lock screen On submit Button Click..
Style Sheet
<style type="text/css">
.LockOff
{
display: none;
visibility: hidden;
}
.LockOn
{
display: block;
visibility: visible;
position: absolute;
z-index: 999;
top: 0px;
left: 0px;
width: 105%;
height: 105%;
background-color: #fff;
text-align: center;
padding-top: 20%;
filter: alpha(opacity=100);
opacity: 0.80;
}
</style>
<script type="text/jscript">
function skm_LockScreen() {
var lock = document.getElementById('skm_LockPane');
if (lock)
lock.className = 'LockOn';
}
</scrip>
<asp:Button ID="Button1" runat="server" OnClick="Button1_Click" Text="Button" OnClientClick="javascript:skm_LockScreen()" />
<div id="skm_LockPane" class="LockOff">
<img alt="Processing " height="60px" width="60px" src="Images/progress.gif" />
</div>
Get Columns and Tables Contain Word
Get columns and tables contain word
select name as columnName,object_name(object_id)as tableName from sys.columns where object_id in
(select object_id from sys.tables where name like '%account%') and name like '%_%' order by tablename
For finding The Foreign Keys On Table
Try This Out...
select * from (
Select object_name(rkeyid) Parent_Table,object_name(fkeyid) Child_Table,object_name(constid) FKey_Name,
c1.name FKey_Col,c2.name Ref_KeyCol
From
sys.sysforeignkeys s
Inner join sys.syscolumns c1
on ( s.fkeyid = c1.id And s.fkey = c1.colid )
Inner join syscolumns c2
on ( s.rkeyid = c2.id And s.rkey = c2.colid )
) t where child_table like '%ERP_Accounts%'
Order by Parent_Table,Child_Table
Saturday, 17 December 2011
Process image in asp.net on Button Click
var prm = Sys.WebForms.PageRequestManager.getInstance();
prm.add_initializeRequest(InitializeRequest);
prm.add_endRequest(EndRequest);
var postBackElement;
function InitializeRequest(sender, args) {
if (prm.get_isInAsyncPostBack())
args.set_cancel(true);
postBackElement = args.get_postBackElement();
if (postBackElement.id == 'Inventory_MainContent_btn_Save') {
$get('Inventory_MainContent_UpdateProgress1').style.display = 'block';
$get('Inventory_MainContent_btn_Save').disabled = true;
}
}
function EndRequest(sender, args) {
if (postBackElement.id == 'Inventory_MainContent_btn_Save') {
$get('Inventory_MainContent_UpdateProgress1').style.display = 'none';
$get('Inventory_MainContent_btn_Save').disabled = false;
}
}

Please Wait...
Friday, 16 December 2011
Thursday, 15 December 2011
Updating a single updatepanel onclick of multiple buttons
If We Want partially rendering of a part of page on click of multiple buttons then we have to add the multiple triggers for that update panel as defined in code given below
Write code on aspx file


<table style="width: 100%; background-color: #FFFFFF; height: 480px;" align="left">
        <tr valign="top" style="width: 100%">
            <td class="style8" valign="top" rowspan="3" style="background-color: #31307B; width: 20%">
                <asp:Button ID="cmdsummary" runat="server" BackColor="White" Font-Bold="True" ForeColor="#333399"
                    Height="30px"  Text="Summary" Width="222px" />
                <br />
                <asp:Button ID="cmdAdmittedPatient" runat="server" BackColor="White" Font-Bold="True"
                    ForeColor="#000099" Height="30px"  Text="Admitted Patient"
                    Width="222px" onclick="cmdAdmittedPatient_Click" />
                <br />
                <asp:Button ID="cmdRevenueReport" runat="server" BackColor="White" Font-Bold="True"
                    ForeColor="#333399" Height="30px"  Text="Revenue Report"
                    Width="222px" onclick="cmdRevenueReport_Click" />
                <br />
                <asp:Button ID="cmdPanelBilling" runat="server" BackColor="White" Font-Bold="True"
                    ForeColor="#333399" Height="30px"  Text="Panel Billing"
                    Width="222px" onclick="cmdPanelBilling_Click" />
                <br />
                <asp:Button ID="cmdCollectionReport" runat="server" BackColor="White" Font-Bold="True"
                    ForeColor="#333399" Height="30px"  Text="Daily Collection Report"
                    Width="222px" onclick="cmdCollectionReport_Click" />
                <br />
                <asp:Button ID="cmdConsulantShare" runat="server" BackColor="White" Font-Bold="True"
                    ForeColor="#333399" Height="30px"  Text="Consultant Share Report"
                    Width="222px" onclick="cmdConsulantShare_Click" />
                <br />
            </td>
            <td style="width: 80%">
                <asp:UpdatePanel ID="updtpanel" runat="server">
                    <ContentTemplate>
                        <table style="width: 113%; height: 27px;">
                            <tr>
                                <td class="style3">
                                    From Date :
                                </td>
                                <td>
                                    <asp:TextBox ID="txtFrom" runat="server"></asp:TextBox>
                                    <cc1:CalendarExtender ID="CalendarExtender1" runat="server" TargetControlID="txtFrom">
                                    </cc1:CalendarExtender>
                                </td>
                                <td class="style3">
                                    To Date :
                                </td>
                                <td>
                                    <asp:TextBox ID="txtTo" runat="server"></asp:TextBox>
                                    <cc1:CalendarExtender ID="CalendarExtender2" runat="server" TargetControlID="txtTo">
                                    </cc1:CalendarExtender>
                                </td>
                                <td class="style17">
                                    <asp:Button ID="cmdRefersh" runat="server" Text="Refersh"></asp:Button>
                                </td>
                                <td class="style18">
                                </td>
                            </tr>
                        </table>
                        </td>
                        <td class="style16">
                        </td>
                        </tr>
                    </ContentTemplate>
                    <Triggers>
                    <asp:AsyncPostBackTrigger ControlID="cmdsummary" EventName="Click" />
                    <asp:AsyncPostBackTrigger ControlID="cmdAdmittedPatient" EventName="Click" />
                    <asp:AsyncPostBackTrigger ControlID="cmdRevenueReport" EventName="Click" />
                    <asp:AsyncPostBackTrigger ControlID="cmdPanelBilling" EventName="Click" />
                    <asp:AsyncPostBackTrigger ControlID="cmdCollectionReport" EventName="Click" />
                    <asp:AsyncPostBackTrigger ControlID="cmdConsulantShare" EventName="Click" />
                    </Triggers>
                </asp:UpdatePanel>
            </td>
        </tr>
    </table>


Define the events on the code behined file

 protected void Page_Load(object sender, EventArgs e)
        {

        }

        protected void cmdAdmittedPatient_Click(object sender, EventArgs e)
        {
            txtFrom.Text = DateTime.Now.ToString();
            txtTo.Text = DateTime.Now.ToString();

        }

        protected void cmdCollectionReport_Click(object sender, EventArgs e)
        {


            txtFrom.Text = DateTime.Now.ToString();
            txtTo.Text = DateTime.Now.ToString();
        }

        protected void cmdRevenueReport_Click(object sender, EventArgs e)
        {
            txtFrom.Text = DateTime.Now.ToString();
            txtTo.Text = DateTime.Now.ToString();
        }

        protected void cmdPanelBilling_Click(object sender, EventArgs e)
        {
             txtFrom.Text = DateTime.Now.ToString();
             txtTo.Text = DateTime.Now.ToString();
        }

        protected void cmdConsulantShare_Click(object sender, EventArgs e)
        {
             txtFrom.Text = DateTime.Now.ToString();
             txtTo.Text = DateTime.Now.ToString();
        }
Now These Two TextBox Updated On Click All The Buttons
Wednesday, 14 December 2011
Differences Between WCF And ASMX Services in .net
Differences:
The differences (conceptual) between WCF and ASMX Services can he highlighted by several items, but we will discuss the 2 largest.
The differences (conceptual) between WCF and ASMX Services can he highlighted by several items, but we will discuss the 2 largest.
Protocols Support for WCF Service
WCF
WCF
- HTTP
- TCP
- Named Pipes
- MSMQ
- Custom
- UDP
Protocols Support for ASMX Web Service)
ASMX:
HTTP only
ASMX:
HTTP only
Hosting:
ASMX: Can be hosted only with HttpRuntime in IIS
WCF: A WCF component can be hosted in any environment in .NET 3.0 such as a console application, Windows applications, of even IIS
WCF Servces can be hosted outside of a IIS web server
ASMX: Can be hosted only with HttpRuntime in IIS
WCF: A WCF component can be hosted in any environment in .NET 3.0 such as a console application, Windows applications, of even IIS
WCF Servces can be hosted outside of a IIS web server
Ok we’re looked at the overall differences between ASMX Web Services and WCF Services, so now let look at some major advantages of a WCF service and an ASMX Web Service:
- Multiple Protocols:
WCF can work across multiple protocols like HTTP,TCP, MSMQ, etc while ASMX services can use just one, HTTP - Better Interoperability:
WCF is interoperable with other systems, compared to .Net Remoting where the client and service have to be .Net. - Logging:
WCF has a built-in logging system. Simply changing the config file settings provides loging functionality. In ASMX the programmer as to write their own. - Transactions:
- Exeptions:
In ASMX unhandled exceptions are returned to the client (browser, user, etc) as SOAP faults, which WCF does not return then as SOAP faults
WCF can create, and maintain, transactions like COM+
Limitations of ASMX:
- An ASMX page doesnt vital information such as what type of security to use or how to deliver.
- ASMX is tightly coupled with the HTTP runtime, in face it’s so tight with it it’s dependant on IIS to host it.
- ASMX services are instantiated on a per-call basis only.
- ASMX does provide the way for interoperability but with that theres no guaranteed end-to-end security or even reliable communication (which is its job).
Advantages of WCF:
- Unlike ASMX WCF lets you chose the delivery tyoe and type of security, just a minor tweak to the config file is all thats needed.
- A WCF Service can be hosted by any Windows process, as long as it can host .NET Framework 3.0.
- WCF gives you the flexibility on how the service is instantiated such as Singleton, provate session, or per call (which is the only one ASMX offers).
- Not only is WCF interoperable but it also offers end-to-end reliability and security
One more think t
Tuesday, 13 December 2011
Table Locking In T-SQl......
Locking Hints and Examples are as follows. The usage of them is same same but effect is different.
ROWLOCK
Use row-level locks when reading or modifying data.
ROWLOCK
Use row-level locks when reading or modifying data.
PAGLOCK
Use page-level locks when reading or modifying data.
Use page-level locks when reading or modifying data.
TABLOCK
Use a table lock when reading or modifying data.
Use a table lock when reading or modifying data.
DBLOCK
Use a database lock when reading or modifying data.
Use a database lock when reading or modifying data.
UPDLOCK
UPDLOCK reads data without blocking other readers, and update it later with the assurance that the data has not changed since last read.
XLOCK
Use exclusive locks instead of shared locks while reading a table, and use hold locks until the end of the statement or transaction.
UPDLOCK reads data without blocking other readers, and update it later with the assurance that the data has not changed since last read.
XLOCK
Use exclusive locks instead of shared locks while reading a table, and use hold locks until the end of the statement or transaction.
HOLDLOCK
Use a hold lock to hold a lock until completion of the transaction, instead of releasing the lock as soon as the required table, row, or data page is no longer required.
Use a hold lock to hold a lock until completion of the transaction, instead of releasing the lock as soon as the required table, row, or data page is no longer required.
NOLOCK
This does not lock any object. This is the default for SELECT operations. It does not apply to INSERT, UPDATE, and DELETE statements.
This does not lock any object. This is the default for SELECT operations. It does not apply to INSERT, UPDATE, and DELETE statements.
Examples:
SELECT OrderIDFROM Orders WITH (ROWLOCK)WHERE OrderID BETWEEN 100AND 2000UPDATE Products WITH (NOLOCK)SET ProductCat = 'Machine'WHERE ProductSubCat = 'Mac'index in sql server
Now I m Going To Explain the Topic Index in sql server , Which May be Help full To All If Any One Has Some Better Explaination Then Explain It
Index Is Used To Incease The Peformace Of Data Base As Every Organisation Has Its DataBase Which Stores Records As Data Increase In data Base Its Performance Reduce . Now To Mantain The Performance Of Data Base We Use The Indexes In dataBase Or On Our Table
Genral Syntex To create Index:
Create [IndexType] Index on (ColumnName)
Where IndexType Means Type Of Index Weather Unique,Clustered And Non Clustered
IndexName Is The Name Of Index
TableName Is The Name Of The Table On Which U Wann To Create Index
ColumnANme Is The Name Of Column Which Becomes Index For The Table
There Are Two Three Types Of Indexes:
1) Unique Index
2) clustered Index
3) Non Clustered Index
Unique Index :
We Can Create Unique Index Simply By Using Query
create Unique index indexName On TableName(ColumnName)
Unique Index Means , A Index Which Does Not Allow Same Index For More Then One Data Row Means No Two Data Row Can Have Same Index Beside It We Can Not Create Unique Index If Data Row Has Duplicate Value
Clustered Index:
We CAn Create The Clustered Index Simply By Using Query as
Create Clustered Index IndexName on TableName(ColumnName)
A Clustered Index Just create index In Which the logical order just points to the physical oreder of the data rows in data table and this index is created with in data table And The Physical Order Of The DataRows Is Dependent Of The Logical Ordering(Index).
Non Clustered Index:
we Can Create Non Clustered Index As
Create NonClustered Index IndexName On Table(Column)
Unlike Clustered Index, In Non Clustered Index The Physical Order of Table Is Independent of Index
Actually, Clustered Index Create a Logic Order Which Identyfy The Physical Order Of Data rows In Table And The LOgic Order Order Is Stored Independent Of The Table Means Any Where On The Disk
We Can Drop The Index If It Requered After Its Creation as
Drop Index Table.IndexName
Here Its Neccessary To Defined The Index Name With The Table Names
We Can Rename The Created Indexes By Using The Existing Stored Procedure as
EXEC sp_rename 'table.oldIndexName','NewIndexName'
Here sp_rename is inbuelt stoed procedure Which Takes Two Parameters First The Index Name With The Table Name Which Is To Be renamed and Second New Index NAme
We Can See The Currently Created Index On Any Table By Using The Inbuelt Stored Procedure as
Exec sp_helpindex table
This Stored Procedure Is Inbuelt Stored Pocedure Which Takes Only One Parameter Which Is Table NAme
And It Gives Coplete Information Of The Indexes Used On The Table
There Is Another Important InBuelt Stored Procedure Which Gives Complete Information About The Table sp_help it takes only one parameter which is table name
exec sp_help table
now it gives complete information about the table passed as parameter
what's benefits of using index in sql server or oracle ....................
Actually i want to no why we use the indexes in sql server i want to know
Can i Create dynamic Report By Using RDLC Report..............
Actually I want To Create Dynamic RDLC Report Means I Want To Create Completely Dynamic Report By Using RDLC Such As We Can Do Same Using Crystal report.........................
Is It Possible If Yes Then Please Help Me
Thanks And Regards,
Surender Tanwar
Is It Possible If Yes Then Please Help Me
Thanks And Regards,
Surender Tanwar
can i update a single updatepanel on click of multiple button...........
I want partial rendering on my page actually i want that a part of page render on click of
multiple buttons. is any idaea for this if yes then please help me
thanks and regards,
Surender Tanwar
multiple buttons. is any idaea for this if yes then please help me
thanks and regards,
Surender Tanwar
How I use WCF In My Projects....................................
please help me if any one can..................
Monday, 12 December 2011
How To Create Stored Procedure in T-Sql
CREATE PROCEDURE SalesQtys
3> @chvOrderBy VARCHAR(30) = 'qty',
4> @chvSortType VARCHAR(4) = 'ASC'
5> AS
6> DECLARE @chvSQL VARCHAR(255)
7> SELECT @chvSQL = 'SELECT stor_id, ord_num, title_id, qty'
8> SELECT @chvSQL = @chvSQL + ' FROM Sales'
9> SELECT @chvSQL = @chvSQL + ' ORDER BY ' + @chvOrderBy + ' ' + @chvSortType
10> EXEC (@chvSQL)
11> GO
How To Create Triggers in T-SQL
1>
2> CREATE TRIGGER OrderHasCustomer
3> ON Orders
4> FOR INSERT, UPDATE
5> AS
6> IF EXISTS
7> (
8> SELECT 'True'
9> FROM Inserted i
10> LEFT JOIN Customers c
11> ON i.CustomerID = c.CustomerID
12> WHERE c.CustomerID IS NULL
13> )
14> BEGIN
15> RAISERROR('Order Must Have Valid CustomerID',16,1)
16> ROLLBACK TRAN
17> END
18> GO
Bootable Flash Drive
bootable USB guide, here we assume that you are using either
Vista or Windows 7 to create a bootable USB.
bootable USB guide, here we assume that you are using either Vista or Windows 7 to create a bootable USB.
1. Insert your USB (4GB+ preferable) stick to the system and backup all the data from the USB as we are going to format the USB to make it as bootable.
2. Open elevated Command Prompt. To do this, type in CMD in Start menu search field and hit Ctrl + Shift + Enter. Alternatively, navigate to Start > All programs >Accessories > right click on Command Prompt and select run as administrator.
3. When the Command Prompt opens, enter the following command:
DISKPART and hit enter.
LIST DISK and hit enter.
Once you enter the LIST DISK command, it will show the disk number of your USB drive. In the below image my USB drive disk no is Disk 1.
4. In this step you need to enter all the below commands one by one and hit enter. As these commands are self explanatory, you can easily guess what these commands do.
SELECT DISK 1 (Replace DISK 1 with your disk number)
CLEAN
CREATE PARTITION PRIMARY
SELECT PARTITION 1
ACTIVE
FORMAT FS=NTFS
(Format process may take few seconds)
ASSIGN
EXIT
Don’t close the command prompt as we need to execute one more command at the next step. Just minimize it.
5. Insert your Windows DVD in the optical drive and note down the drive letter of the optical drive and USB media. Here I use “D” as my optical (DVD) drive letter and “G” as my USB drive letter.
6. Go back to command prompt and execute the following commands:
6.1. Change directory to the DVD’s boot directory where bootsect lives:
d:
cd d:\boot
6.2. Use bootsect to set the USB as a bootable NTFS drive prepared for a Vista/7 image. I’m assuming that your USB flash drive has been labeled disk G:\ by the computer:
bootsect /nt60 g:
(Where “G” is your USB drive letter)
7. Copy Windows DVD contents to USB.
You are done with your bootable USB. You can now use this bootable USB as bootable DVD on any computer that comes with USB boot feature (most of the current motherboards support this feature).
Note that this bootable USB guide will not work if you are trying to make a bootable USB on XP computer.
Sunday, 1 May 2011
CallBack Feature in Asp.Net
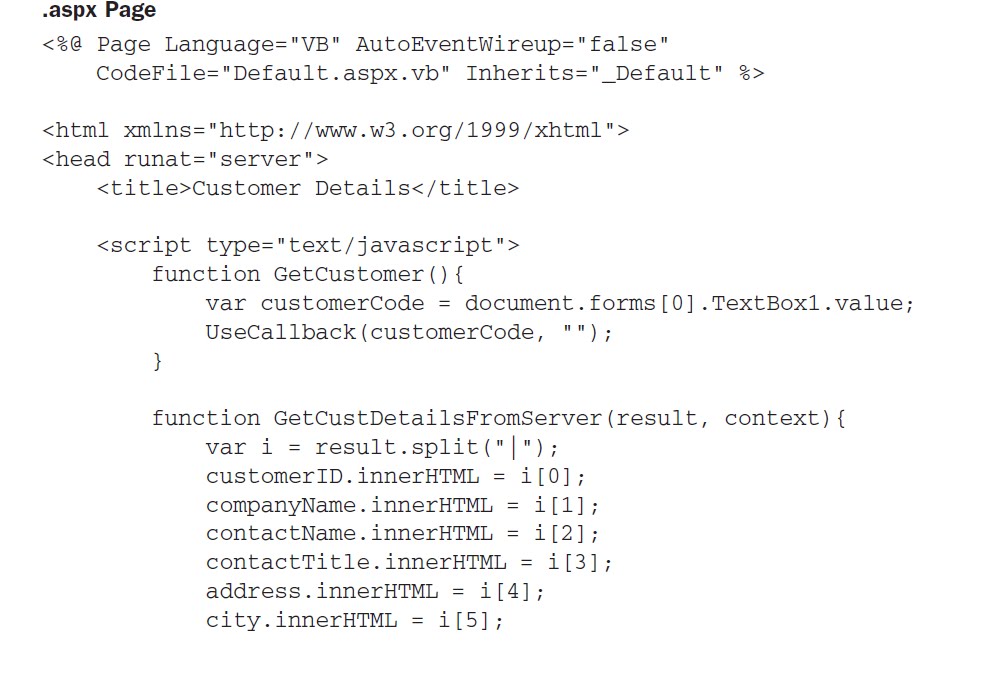

CSharp Code Behind
using System;
using System.Data;
using System.Configuration;
using System.Collections;
using System.Web;
using System.Web.Security;
using System.Web.UI;
using System.Web.UI.WebControls;
using System.Web.UI.WebControls.WebParts;
using System.Web.UI.HtmlControls;
using System.Data.SqlClient;
public partial class Default2 : System.Web.UI.Page,
System.Web.UI.ICallbackEventHandler
{
private string _callbackResult = null;
protected void Page_Load(object sender, EventArgs e)
{
string cbReference = Page.ClientScript.GetCallbackEventReference(this,
"arg", "GetCustDetailsFromServer", "context");
string cbScript = "function UseCallback(arg, context)" +
"{" + cbReference + ";" + "}";
Page.ClientScript.RegisterClientScriptBlock(this.GetType(),
"UseCallback", cbScript, true);
}
#region ICallbackEventHandler Members
public string GetCallbackResult()
{
return _callbackResult;
}
public void RaiseCallbackEvent(string eventArgument)
{
SqlConnection conn = new
SqlConnection("Data Source=.;Initial Catalog=Northwind;User ID=sa");
SqlCommand cmd = new
SqlCommand("Select * From Customers Where CustomerID = ’" +
eventArgument + "’", conn);
conn.Open();
SqlDataReader MyReader;
MyReader = cmd.ExecuteReader(CommandBehavior.CloseConnection);
string[] MyValues = new string[11];
while (MyReader.Read())
{
MyValues[0] = MyReader["CustomerID"].ToString();
MyValues[1] = MyReader["CompanyName"].ToString();
MyValues[2] = MyReader["ContactName"].ToString();
MyValues[3] = MyReader["ContactTitle"].ToString();
MyValues[4] = MyReader["Address"].ToString();
MyValues[5] = MyReader["City"].ToString();
MyValues[6] = MyReader["Region"].ToString();
MyValues[7] = MyReader["PostalCode"].ToString();
MyValues[8] = MyReader["Country"].ToString();
MyValues[9] = MyReader["Phone"].ToString();
MyValues[10] = MyReader["Fax"].ToString();
}
_callbackResult = String.Join("|", MyValues);
}
#endregion
}
Saturday, 30 April 2011
How To Create Sql Connection in C# and in Vb
Csharp
SqlConnection conn = new
SqlConnection("Data Source=.;Initial Catalog=Northwind;User ID=sa");
SqlCommand cmd = new
SqlCommand("Select * From Customers Where CustomerID = ’" +
eventArgument + "’", conn);
conn.Open();
SqlDataReader MyReader;
MyReader = cmd.ExecuteReader(CommandBehavior.CloseConnection);
string[] MyValues = new string[11];
String.Join("|", MyValues);//This is use to concate the array into string
Dim conn As SqlConnection = New _
SqlConnection("Data Source=.;Initial Catalog=Northwind;User ID=sa")
Dim cmd As SqlCommand = New _
SqlCommand("Select * From Customers Where CustomerID = ’" & _
eventArgument & "’", conn)
conn.Open()
Sunday, 24 April 2011
Creating Bootable USB flash drive
bootable USB guide, here we assume that you are using either Vista or Windows 7 to create a bootable USB.
1. Insert your USB (4GB+ preferable) stick to the system and backup all the data from the USB as we are going to format the USB to make it as bootable.
2. Open elevated Command Prompt. To do this, type in CMD in Start menu search field and hit Ctrl + Shift + Enter. Alternatively, navigate to Start > All programs >Accessories > right click on Command Prompt and select run as administrator.
3. When the Command Prompt opens, enter the following command:
DISKPART and hit enter.
LIST DISK and hit enter.
Once you enter the LIST DISK command, it will show the disk number of your USB drive. In the below image my USB drive disk no is Disk 1.
4. In this step you need to enter all the below commands one by one and hit enter. As these commands are self explanatory, you can easily guess what these commands do.
SELECT DISK 1 (Replace DISK 1 with your disk number)
CLEAN
CREATE PARTITION PRIMARY
SELECT PARTITION 1
ACTIVE
FORMAT FS=NTFS
(Format process may take few seconds)
ASSIGN
EXIT
Don’t close the command prompt as we need to execute one more command at the next step. Just minimize it.
5. Insert your Windows DVD in the optical drive and note down the drive letter of the optical drive and USB media. Here I use “D” as my optical (DVD) drive letter and “G” as my USB drive letter.
6. Go back to command prompt and execute the following commands:
6.1. Change directory to the DVD’s boot directory where bootsect lives:
d:
cd d:\boot
6.2. Use bootsect to set the USB as a bootable NTFS drive prepared for a Vista/7 image. I’m assuming that your USB flash drive has been labeled disk G:\ by the computer:
bootsect /nt60 g:
(Where “G” is your USB drive letter)
7. Copy Windows DVD contents to USB.
You are done with your bootable USB. You can now use this bootable USB as bootable DVD on any computer that comes with USB boot feature (most of the current motherboards support this feature).
Note that this bootable USB guide will not work if you are trying to make a bootable USB on XP computer.
Subscribe to:
Posts (Atom)